

Notice: I receive compensation if you buy something through affiliate links on this post. This does not change the price you would pay. As an Amazon Associate I earn from qualifying purchases.
The crumb is soft.
But the crust fights your knife.
The bottom sounds hollow.
Then slices like a cracker.
Or it feels fine at first.
Then cools into something thick, dry, or leathery.
Most crust problems leave visible clues.
Once you know when the crust hardens, where it hardens, and what kind of loaf you were trying to make, the next fix gets much easier.
Table of Contents
- 1 Fast Diagnosis: What’s Making Your Bread Crust Too Hard?
- 2 What the Crust Is Showing You
- 3 If the Bottom Crust Is the Problem
- 4 When Bread Crust Is Too Hard Right Out of the Oven
- 5 When the Crust Turns Tough After Cooling
- 6 If the Loaf Is Lean, the Crust May Be Acting Like Lean Dough
- 7 Pick the Outcome You Want, Then Use the Matching Method
- 8 Quick Rescue for a Loaf That Is Already Baked
- 9 Mix It. Fix It. Bake It Today.
- 10 FAQs
Fast Diagnosis: What’s Making Your Bread Crust Too Hard?
Most hard bread crust issues come from one of three places: the bake environment, the dough formula, or what happens after the loaf comes out of the oven.
That means heat and dryness, lean versus enriched dough, or the way moisture redistributes as the bread cools.
The fastest way to diagnose it is to ask two questions: When is it hard? And where is it worst?
Here’s the quick read before we go deeper:
- If bread crust is hard right out of the oven, the usual cause is the bake environment: too much heat, too little moisture, or too long uncovered.
- If bread crust turns tough after cooling, the usual cause is moisture loss during cooling and storage, not the bake itself.
- If the bottom crust is much harder than the top, the usual cause is excess bottom heat from rack position, pan material, or baking surface.
- If you want a soft sandwich crust, use a different method than artisan bread: enriched dough, pan baking, and controlled cooling.
From here, the goal is to match what you see to the most likely cause.
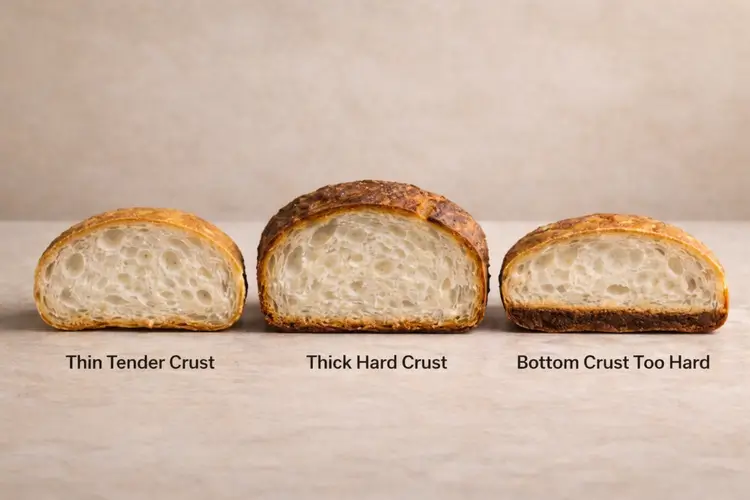
What the Crust Is Showing You
A hard crust is not one single problem.
It is a pattern.
The color, thickness, location, and timing all matter because they point to different decisions.
Before changing ingredients, it helps to match what you see to the most likely cause.
Bread Crust Problem Solver
| What you see | Most likely cause | Do this next |
|---|---|---|
| Crust is thick and very dark, but the crumb is fine | Baked too long, oven runs hot, or the loaf stayed uncovered too long | Shorten the bake slightly, verify oven temperature, and reduce the uncovered phase |
| Crust is hard, and the crumb is dry or crumbly | Bread lost too much moisture during baking | Bake to doneness, then stop; consider a slightly hotter oven for a shorter bake |
| Crust is okay hot, then turns tough or leathery after cooling | Moisture migration and dry-air exposure after baking | Let the loaf vent briefly, then wrap lightly while still warm, and store once just warm |
| Bottom crust is thick or hard, but the top is fine | Too much bottom heat from the rack position, pan, stone, or steel | Move the loaf higher, buffer the bottom heat, or switch pan material |
| Crust is thick, and the loaf also feels dense | Usually: structure or fermentation issue | Start with the dense bread guide, then check proofing and loaf structure. |
| Crust is hard on a lean artisan loaf, but you wanted soft slices | Method mismatch rather than failure | Use a soft sandwich loaf method instead of an open artisan bake |
The table matters because the right fix depends on the crust pattern you’re seeing.
A loaf with a dark, thick crust and a moist interior needs a different adjustment than a loaf with a pale top and a hard bottom.
The more clearly you can name the pattern, the more targeted the fix can be.
One crust pattern shows up often enough to deserve its own closer look: a loaf that is mostly fine except for a bottom crust that turns thick, dark, or hard.
If the Bottom Crust Is the Problem
A bottom crust problem has a different shape than an all-over hard crust problem.
The top may look normal. The sides may slice fine.
But the base is thick, dark, and difficult to cut. When that happens, the issue is usually heat transfer from below, not the whole formula.
The first fix is simple.
Move the loaf one rack higher and bake again. If that does not solve it, place an empty sheet pan on the rack below to buffer some of the heat.
If you are baking in a dark metal pan, try a lighter-colored pan.
If you are using a baking steel or stone, look at its position. Too close to the loaf can intensify bottom browning fast, especially in smaller ovens that run hot underneath.
Here is the adjustment ladder I would use before changing the recipe:
- Move the loaf up one rack position.
- Add a sheet pan underneath as a heat buffer.
- Switch from a dark pan to a lighter metal pan or a loaf pan with less aggressive browning.
- Reposition a stone or steel to prevent it from heating straight into the base.
Those changes work because the bottom crust is often a conduction problem first. You do not need to reinvent the loaf if only one part is overbrowning.
How Steam Changes Crust Formation
Steam affects when the crust sets, not whether the finished bread stays soft. Steam helps by delaying how fast the outer skin sets in the early part of the bake. That gives the loaf more room to expand before the surface firms up, and it also changes how browning develops.
Covered baking, a cloche, or a Dutch oven works because it traps moisture around the dough during that early window. But steam is a control tool, not a guarantee of tender sandwich-style crust. For a visual explanation of why covered baking traps moisture so effectively, see King Arthur’s article on covered baker bread steaming.
A lean dough baked hard can still finish with a thick crust even if the early steam phase was good.
If you want a deeper look at home steaming methods, King Arthur’s guide to baking bread with steam at home is a solid reference.
If the problem is not limited to the base, the next question is when the crust turns hard across the loaf.
When Bread Crust Is Too Hard Right Out of the Oven
If the crust comes out hard right away, start with the bake environment.
In most home ovens, it usually means too much time, too much direct heat, or too much uncovered baking for the kind of loaf you wanted.
Loaf type matters too. A lean dough made with flour, water, salt, and yeast is meant to bake with a different crust than a sandwich loaf enriched with fat, milk, sugar, or egg.
So if you bake a lean artisan loaf but want a soft sandwich crust, the result can feel wrong even when the bake itself was fine. The method and the goal just did not match.
If the crust is dark and thick but the crumb is good, start with small changes.
Shorten the bake slightly and check your oven with a thermometer. Many homemade bread crust problems come from ovens that run hotter than the dial says.
If the loaf is fully baked but drying out, a slightly hotter oven with a shorter bake can sometimes preserve more moisture than a long, lower bake.
If you want a practical reference for checking doneness before the crust dries out too far, King Arthur’s article on using a thermometer with yeast bread is useful here.
If your goal is soft sandwich bread, pick a method built for that result: an enriched dough, a pan loaf, or a Pullman-style bake. That is a better fit than trying to make an open-baked lean loaf behave like sandwich bread.
But not every hard crust problem starts in the oven. Some loaves bake well, then toughen as they cool
When the Crust Turns Tough After Cooling
A crust that comes out fine and then turns chewy or leathery points to a different issue.
At that stage, the loaf is not just reacting to oven heat. It is reacting to moisture moving from the crumb toward the crust, and to the air around it as it cools.
That is why bread can come out crisp, then soften, or seem fine at first, then turn tough. The crust and crumb are redistributing moisture.
In a dry room, the crust can dry out too much.
In other cases, the loaf sits uncovered too long and the outer layer firms more than you wanted.
The fix is not to trap steam right away and risk a gummy crust.
Let the loaf vent off its hottest steam first. Then, while it is still warm, wrap it lightly or store it properly so the crust does not dry out.
If your goal is soft-crust bread, the next part matters as much as the bake. A loaf cooled too long in dry air can undo an otherwise good result.
Quick check
When does the crust turn hard? That timing clue usually tells you where to look first.
Hard right out of the oven
Start with bake time, oven heat, and how long the loaf stayed uncovered.
Hard after cooling
Start with moisture movement, cooling, light wrapping, and storage.
If the Loaf Is Lean, the Crust May Be Acting Like Lean Dough
Sometimes the crust is not faulty. The loaf is just doing what that style of dough is meant to do.
Lean doughs naturally bake into a firmer, drier crust than enriched pan loaves.
So the real question is not just whether the crust is hard. It is whether it is harder than what that loaf style should produce.
A lean boule or bâtard can have a thin, crackly crust and still slice well. That is very different from a thick, hard crust or a bottom that cuts like a cracker.
If your goal is a thin artisan crust that is easier to cut, you do not need a different bread type. You just need better control over bake length, steam, and final color.
A shorter uncovered phase, a more accurate oven temperature, or less bottom heat can shift the crust from thick and hard to thin and crisp
Once you know whether the crust is truly off or simply mismatched to your goal, the next step is to choose the method that fits the result you want.
Pick the Outcome You Want, Then Use the Matching Method
Crust problems get easier to fix when you stop treating every loaf the same.
The better question is not just how to soften bread crust. It is what kind of crust this loaf was supposed to have in the first place.
From here, the fix depends on the result you want, not just the problem you see.
Pick your crust goal
The best fix depends on the result you want. Match your loaf goal to the method that gets you there.
Soft sandwich crust
Use an enriched dough, a pan loaf, and gentler cooling if your goal is tender, easy-to-slice bread.
Thin artisan crust
Keep the lean loaf style, but adjust bake length, steam, and final color for a crust that stays thinner and easier to cut.
Oven setup fix
Check oven temperature, rack position, bottom heat, and covered versus open baking if the crust keeps coming out harsher than expected.
If You Want Soft Sandwich Crust
Soft sandwich crust needs a different setup from artisan bread.
An enriched dough helps. A pan loaf helps. Covered baking and proper cooling help too.
If your goal is tender, easy-to-slice bread, use a method built for that result instead of trying to soften a lean open-baked loaf after the fact.
If You Want Thin Artisan Crust That Is Easier to Cut
The goal here is not no crust. It is a thinner crust that still has structure and good color.
That usually comes down to better control of bake length, oven temperature, and the early steam or covered phase. Small changes there can turn a thick, hard crust into one that stays crisp but cuts more cleanly.
If Your Crust Problem Is Really an Oven Problem
Sometimes the dough is not the issue.
The oven is. A hot-running oven, too much bottom heat, or aggressive convection can all make the crust thicker and harder than it should be.
In that case, an oven thermometer, rack adjustment, or a better covered-bake setup will do more than changing ingredients.
If You’re Considering Appliances
Appliances only matter if they help you control the variable that is causing the problem.
For softer crusts, the useful features are steam capability, covered-bake compatibility, and bread machine settings like light crust or soft crust.
Those tools can help, but only when they match the kind of loaf you want to make.
Those are the best long-term fixes. But if the loaf is already baked, you still have one short rescue option.
Quick Rescue for a Loaf That Is Already Baked
This is a rescue, not the main fix. It helps when the loaf is already done and the crust ended up harder than you wanted.
How to Soften Bread Crust After Baking
If the bread is fully baked but the crust is too hard, wrap the loaf loosely in a clean towel while it is still warm, not piping hot. That traps a little moisture and softens the outer layer without making the crust wet.
If the loaf is already cool and too firm, warm it briefly in a low oven, then wrap it for a short rest. The goal is gentle moisture redistribution, not steaming the loaf into gumminess.
Use this when the bake is finished, and the loaf needs softening. Do not use it to hide underbaking or a loaf with a wet interior.
That quick rescue can help with the loaf already on your counter.
But the bigger win is knowing what caused the crust to harden in the first place, so the next loaf comes out closer to what you wanted.
Mix It. Fix It. Bake It Today.
Watch when the crust hardens.
Watch where it hardens.
Watch whether the loaf matched the crust you were trying to get.
Most crust problems do not need a total reset.
They need one cleaner read.
A loaf baked a few minutes too long.
A rack set one level too low.
A lean formula judged like a sandwich loaf.
A good loaf left too long in dry air.
When you read the crust clearly, the next loaf gets simpler.
You stop guessing.
You start recognizing.
Softer where you want it.
Thinner where it should be.
Easier to slice.
Better to eat.
Determine your crust pattern above and run the first fix on your next loaf.