
Notice: I receive compensation if you buy something through affiliate links on this post. This does not change the price you would pay. As an Amazon Associate I earn from qualifying purchases.
KitchenAid mixer troubleshooting isn’t something you think about until your stand mixer suddenly stops mid-recipe. I learned that the hard way when mine shut off while kneading three loaves’ worth of bread dough.
After letting it cool for about 20 minutes, it started working again. The motor hadn’t failed; it had simply overheated.
That experience taught me that many KitchenAid problems have simple causes and straightforward fixes.
Most KitchenAid mixer problems come down to one of four categories:
- Electrical issues – The mixer won’t start, stops unexpectedly, or has speed control problems.
- Mechanical issues – Noises, oil leaks, worn gears, or loose parts.
- Attachment and alignment issues – The bowl won’t lock, attachments won’t spin properly, or the beater scrapes the bowl.
- Overload and operating issues – The mixer overheats, shakes, or struggles with heavy dough.
This guide walks you through the most common problems, their likely causes, and practical fixes so you can get back to baking as quickly as possible.
KitchenAid Mixer Problems
KitchenAid Mixer Problems: Causes and Quick Fixes
| Problem | Common Causes | Quick Fix |
|---|---|---|
| Won’t start | Loose plug or bad outlet; overheated motor; faulty speed control or internal electrical connection | Check power; let the mixer cool; troubleshoot the speed control if it still won’t start |
| Overheats or shuts off | Batch is too heavy; kneading speed is too high; vents are blocked; mixer has run too long under load | Let it cool; reduce the batch; use Speed 2 for dough; clear the vents |
| Attachment won’t spin | Attachment isn’t seated correctly; load is too heavy; connection or attachment is worn or damaged | Re-seat the attachment; reduce the load; inspect the attachment and connection |
| Bowl won’t lock | Food debris blocks the base; bowl is misaligned; locking tabs are worn or damaged | Clean the base; reposition the bowl; inspect the locking points for wear |
| Beater scrapes bowl | Beater-to-bowl clearance is incorrect; bowl isn’t seated correctly; attachment may be bent | Adjust the bowl clearance; reseat the bowl; inspect the beater or hook |
| Leaks oil | Mixer grease has separated; heat speeds separation; old grease may need replacing | Wipe away leaked oil; store the mixer cooler; replace the grease if needed |
| Shakes or walks | Ingredients are unevenly distributed; speed is too high for the load; mixer is on an unstable or slippery surface | Balance the load; lower the speed; place the mixer on a flat, stable surface |
| Attachment is stuck | Dried food around the shaft; rust or corrosion; attachment was misaligned; shaft may be worn | Clean around the shaft; wiggle gently; use food-safe lubricant if needed |
| Noise when changing speeds | Worn gears or bearings; internal components may be dry or damaged | Stop using the mixer; inspect the internal components or have it serviced |
| Mixer is unusually noisy | Worn gears; dry bearings or components; motor is struggling under a heavy load | Reduce the load; check lubrication; inspect gears or motor if the noise persists |
| Mixer head is loose | Lock lever is loose; hinge pin has shifted; internal or external screws have loosened | Check the lock; tighten the hinge pin and accessible screws; realign if needed |
| Speed control problems | Misaligned speed control plate; worn governor; faulty phase control board; loose or damaged wiring | Start with control adjustments; internal electrical faults may require professional repair |
Before You take Your Mixer Apart: Try These Quick Checks
Before you assume your KitchenAid needs repairs, take a minute to rule out the most common causes. Many mixer problems are caused by overload, simple setup issues, or built-in safety features rather than failed parts.
Before You Take Your Mixer Apart
- Check the power outlet. Make sure the mixer is firmly plugged into a working outlet.
- Let the mixer cool down. If it stopped while kneading dough, wait 20–30 minutes before trying again.
- Remove extension cords. Plug the mixer directly into a wall outlet whenever possible.
- Reduce the batch size. Large batches and stiff doughs can overload the motor.
- Use the correct speed. For bread dough, KitchenAid recommends mixing on Speed 2.
- Check that the bowl and attachment are fully locked. A loose bowl or improperly installed attachment can cause several common mixer problems.
If your mixer still isn’t working properly after these checks, use the troubleshooting guide below to identify the most likely cause.
Repair Difficulty Guide
- 🟢 Easy – Basic checks or adjustments with no disassembly.
- 🟡 Moderate – Minor repairs or adjustments that may require basic tools.
- 🔴 Advanced – Internal disassembly, electrical work, or professional repair.
1. KitchenAid Stand Mixer Won’t Turn On
You flip the switch expecting that familiar whir… and nothing. No spin, no hum.
Before you worry about repairs or replacements, know that stand mixer troubleshooting almost always begins with simple checks, and many times, the solution is surprisingly quick and easy.
Most “won’t turn on” problems can be solved with a few simple checks before any repairs are needed.
Here’s what to look for:
Common Causes and Fixes
1. Power Supply Issues
- Cause: Sometimes it’s as basic as the outlet or power cord.
- Fix:
- Make sure the mixer is firmly plugged into a working outlet.
- Try a different outlet to rule out a tripped circuit breaker.
- Check the cord for visible wear or damage. If it’s frayed, it needs replacement.
2. Speed Control Switch Not Engaging
- Cause: The speed control lever can sometimes stick or get misaligned.
- Fix:
- Gently move the lever back and forth a few times while the mixer is off.
- If the switch feels loose or doesn’t “click” properly, it might need adjustment or replacement. KitchenAid support can guide you here.
3. Motor Overheating Protection
- Cause: If the mixer ran for a long time, the motor might have overheated and shut off as a safety measure.
- Fix:
- Unplug the mixer.
- Let it cool down for 20–30 minutes before turning it back on.
- Next time, give your mixer breaks between heavy batches.
4. Internal Component Issues
- Cause: If the above checks don’t solve it, internal parts like the motor brushes or speed control board could be worn out.
- Fix:
- Motor brushes can be replaced at home if you’re comfortable with basic DIY repairs (KitchenAid has guides).
- Speed control boards typically require professional servicing.
Pro Tip
If your mixer suddenly stops mid-recipe, wait until it cools down before troubleshooting. Restarting too soon can cause more stress on the motor.
Next Steps
For detailed instructions with videos on checking power issues, replacing motor brushes, and more, see our full guide: KitchenAid Mixer Stopped Working? Complete Troubleshooting and Repair Guide
Need a quick fix or professional help? Our KitchenAid Repair Finder shows certified repair services nationwide and in major U.S. metros.
2. Why Is My KitchenAid Mixer Overheating and Shutting Off?
You’re in the middle of kneading bread dough when the mixer starts to slow down… and then stops altogether. The motor feels warm, and you’re left wondering if something’s seriously wrong.
Most overheating problems are caused by built-in overload protection rather than a failed motor. Start with the simple checks below before considering repairs.
Why Mixers Overheat
- Continuous Heavy Mixing
Running the mixer for long periods, especially on high speeds, can strain the motor. - Overloading the Bowl
Thick bread doughs or too much batter at once can make the motor work harder than it should. - Blocked Air Vents
Flour, sugar dust, or even kitchen grease can clog the motor vents and stop it from cooling properly.
How to Fix an Overheating Mixer
- Stop and Unplug
Turn off the mixer immediately and unplug it. Let it cool for 20–30 minutes before turning it on again. - Check the Air Vents
Look at the motor housing (usually at the back) for dust or crumbs. A small brush or vacuum attachment works wonders for cleaning these areas. - Reduce the Load
If the dough is extremely stiff, cut the batch in half and mix in two rounds. KitchenAid recommends Speed 2 for kneading—anything higher can strain the motor. - Give It Breaks
For big baking days, let the mixer rest between batches to prevent heat buildup.
For a full detailed instruction on fixing a mixer that overheats see our full guide: How To Fix Overheating KitchenAid Mixer.
⚠ Warning: Never knead bread dough above Speed 2. Higher speeds place unnecessary strain on the motor and can trigger the mixer’s thermal overload protection.
3. Why Won’t the Attachment Spin on My Mixer?
You lock in the beater, start the mixer, and it either wobbles or doesn’t spin at all. Frustrating, right?
Most attachment problems are caused by improper installation, bowl alignment, or an overloaded mixer. Check these simple fixes before assuming the attachment or mixer is faulty.
Why Attachments Stop Spinning
- Loose Attachment Connection
If the beater isn’t fully locked into the shaft, it can slip or fail to turn. - Overloaded Mixer
Heavy doughs or thick batters can slow the attachment or make it stop mid-mix. - Misalignment or Worn Gears
Internal parts like gears can wear down over time, especially with frequent use.
How to Fix It
- Check the Connection
Turn off the mixer, remove the attachment, and push it back into place until you hear or feel it “click.” - Lighten the Load
If your batter is very dense, divide it into smaller portions or mix at a lower speed. - Inspect for Wear
If the attachment wobbles even when secured, look for bent edges or worn parts. Replace damaged beaters as needed. - Listen for Strange Noises
Grinding or rattling sounds may signal worn gears inside the mixer. This is when you call in a pro or check with KitchenAid support.
Pro Tip
A dab of food-safe lubricant on the beater shaft every so often keeps attachments spinning smoothly and makes removal easier later.
4. How Do I Fix a Mixer Bowl That Won’t Lock?
You twist the bowl into place, but it won’t stay put or it spins loosely while
Most bowl-lock issues involve adjustment or alignment rather than broken parts, so disassembly is usually not required.
Possible Reasons
- Misalignment
If the bowl isn’t sitting just right on the base, it won’t lock properly. - Worn Tabs or Base
Over time, the locking tabs on the bowl or the base itself can wear down. - Debris in the Locking Mechanism
Flour or crumbs around the base can prevent the bowl from locking securely.
How to Get the Bowl Locked In
- Reposition the Bowl
Lift the bowl off the base, clean the contact points, and set it back in the grooves. Sometimes it just needs a precise fit. - Clean the Base and Tabs
A quick wipe with a damp cloth removes flour or crumbs that block the lock from engaging. - Check for Wear
If the tabs on the bowl look bent or worn, the bowl might need replacing. KitchenAid sells replacements for most models. - Give It a Gentle Twist
For bowls that feel “stuck,” try turning it slightly in the opposite direction first, then back into place. It often works.
Pro Tip
Keep the base and bowl connection points clean after every use. A two-second wipe now saves you from wrestling with the bowl later.
5. Why Is My Mixer’s Beater Scraping the Bowl?
That screeching sound when metal hits metal can make you flinch.
But don’t worry. Many KitchenAid mixer issues like this are solved with small adjustments, not major repairs.
Correcting bowl clearance usually takes only a simple adjustment using the bowl-height screw or by checking that the bowl and attachment are properly seated.
What Causes the Scraping
- Bowl Height Misalignment
If the bowl sits too high or too low, the beater or dough hook can hit the bottom or sides. - Worn or Bent Attachments
Over time, beaters or hooks can warp slightly, especially if they’ve taken a few accidental knocks in storage.
How to Stop the Scraping
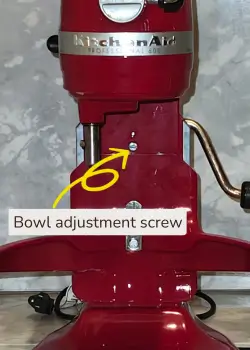
- Adjust the Bowl Height
- On tilt-head mixers, lift the head and locate the small screw near the hinge.
- On bowl-lift mixers, find the screw near the bowl arms.
- Turn the screw clockwise to raise or counterclockwise to lower the bowl.
- Aim for a gap about the thickness of a dime between the attachment and the bow
- On tilt-head mixers, lift the head and locate the small screw near the hinge.
- Inspect the Attachments
Look for bent edges or chipping on the beater or hook. Replace damaged attachments so they mix evenly without scraping. - Test Before Mixing
After adjustments, run the mixer on low speed first to ensure everything clears the bowl properly.
Pro Tip
Do a quick “dime test” after every adjustment: place a dime in the empty bowl, run the mixer on low, and make sure the beater just barely nudges it, not enough to scrape, but close enough for thorough mixing.
6. Why Is My KitchenAid Mixer Leaking Oil?
You pull out the bowl to add your ingredients and spot streaks of oil in the batter, or dripping from the mixer head.
It might look gross, but this is actually one of those common KitchenAid mixer problems that usually isn’t as bad as it seems.
Cleaning up the leaked oil is straightforward, but replacing the grease requires opening the mixer housing. If you’re not comfortable working on internal components, consider having the mixer serviced.
Why It Happens
- Grease Separation
KitchenAid mixers are packed with food-safe grease to keep the gears running smoothly. Over time, especially if the mixer sits unused for long periods, the grease can break down into oil and solids. The oil is what leaks out. - Temperature Swings
Storing the mixer in a warm spot, like near the oven, can speed up this breakdown and cause leaking. - Heavy Use Without Regreasing
After years of mixing, the original grease can simply wear out and need replacing.
How to Fix the Oil Leak
- Wipe Up the Leaked Oil
Start by cleaning any oil with a soft cloth to prevent it from reaching your food. - Reapply Fresh Grease
- Unplug the mixer and open the motor housing (check your model’s manual for steps).
- Remove the old, separated grease.
- Apply new, food-safe grease to the gears.
⚠ Warning: Use only food-grade mixer grease. Automotive grease or general-purpose lubricants are not food safe and should never be used inside a stand mixer.
- Run the Mixer Regularly
Even short runs once a month help prevent the grease from separating. - Store in a Cool Place
Keep the mixer away from direct sunlight or heat to slow down grease breakdown.
Pro Tip
KitchenAid sells a food-grade grease kit designed for its mixers. If you’re not comfortable opening the motor housing yourself, many local appliance repair shops or KitchenAid service centers can handle it.
7. How Do I Stop My Mixer from Shaking on the Counter?
You set your mixer on the counter, start kneading dough, and suddenly it’s “walking” across the surface. It’s more annoying than dangerous, but it can still make a mess and cause wear on the mixer over time.
Shaking or “walking” is usually caused by how the mixer is being used rather than a mechanical fault. The fixes below involve simple changes to loading, speed, and placement.
Why Mixers Shake or “Walk”
- Uneven Ingredient Load
Heavy batter clumped to one side can throw the mixer off balance. - High Speeds with Dense Dough
Mixing thick doughs on high speeds can create too much force, especially in tilt-head models. - Slippery or Unstable Surface
Smooth countertops or crumbs under the feet can make the mixer slide around.
How to Fix It
- Even Out Ingredients
Distribute the ingredients in the bowl before starting, and scrape down the sides as you mix to keep things balanced. - Use the Right Speed
For bread dough and heavy batters, stick to Speed 2. Higher speeds can cause shaking and put extra stress on the motor. - Stabilize the Mixer
Place the mixer on a flat, dry surface. A non-slip mat under the base adds extra grip and prevents “walking.” - Take Breaks for Heavy Doughs
Give the mixer a few minutes to rest when tackling dense recipes—this helps prevent shaking and overheating.
Pro Tip
Some bakers keep a thin silicone mat under their mixer full-time. It not only stops slipping but also protects the countertop from scratches and noise.
8. How Do You Remove a Stuck Attachment from a KitchenAid Mixer?
You finish mixing, go to remove the beater, and… nothing. It won’t budge no matter how hard you twist or pull.
Stuck attachments have simple fixes once you know the cause.
Most stuck attachments can be removed with gentle cleaning and proper technique. Replacement parts are rarely needed unless the shaft or attachment is damaged.
Why Attachments Get Stuck
- Dried Batter or Food Debris
Mixture left around the shaft can harden and act like glue. - Misalignment
If the attachment wasn’t seated properly, it might lock too tightly during mixing. - Rust or Corrosion
Moisture around the beater shaft can lead to rust, especially if the mixer isn’t dried after cleaning. - Worn Beater Shaft
Over time, the shaft can wear down, making it harder to attach or remove accessories.
How to Remove the Stuck Attachment
- Unplug the Mixer First
Safety first. Always disconnect power before fiddling with attachments. - Wiggle and Twist Gently
Try moving the beater side to side while pulling down slightly. This often loosens food particles or tension. - Clean the Area
Use a damp cloth to wipe around the shaft, removing any dried batter or debris. - Use Food-Safe Lubricant
For rust or stiffness, apply a small amount of food-safe oil to the shaft before reattaching or removing accessories. - Check for Wear
If attachments continue to stick, inspect the beater shaft for damage. Replacements are available if needed.
Pro Tip
Clean and dry the beater and shaft after every use. A quick wipe now prevents a stuck attachment later.
⚠ Warning: Never force a stuck attachment with pliers or excessive force. Doing so can damage the attachment hub or beater shaft.
9. Why Does My Mixer Make Unusual Noises When Changing Speeds?
Noises that occur specifically when changing speeds often point to internal gear or bearing wear. Most repairs require opening the mixer or having it inspected by a qualified technician.
What to Do
- Stop using the mixer until you can inspect the gears (or have a professional check it)
- Lubricate dry gears with food-safe grease if that’s the issue
- Replace worn gears if necessary to prevent further damage
10. Why Is My Mixer So Noisy?
Start by ruling out heavy loads and lubrication issues. If the noise continues after basic maintenance, the mixer may need internal inspection or replacement parts.
If your KitchenAid wakes the whole house with grinding or rattling, it could be one of these:
- Worn Gears: Damaged gears make grinding sounds and need replacing
- Dry Bearings or Components: Grease keeps things running quietly. Dry parts need lubrication
- Motor Problems: A struggling motor can produce high-pitched whining under load
Solution: Regular lubrication, reducing heavy loads, or gear replacements often fix the problem.
11. How Do I Fix a Loose KitchenAid Mixer Head (Tilt-Head Models)?
A wobbling motor head on tilt-head mixers usually comes down to a loose locking mechanism or worn parts.
Most loose mixer heads can be corrected by adjusting the lock mechanism or tightening accessible hardware. If the head still moves excessively after these adjustments, internal parts may need professional replacement.
What to Check
- Lock Lever Engagement: Make sure the head is fully lowered and the lever is properly engaged
- Lock Lever Tension: Tighten the adjustment screw or nut near the lever if it feels too loose
- Hinge Pin Alignment: Tighten the hinge pin to keep the head and base aligned
- Internal Screws: Remove the trim band and tighten any loose screws carefully
When to Call for Help
If tightening and adjustments don’t fix the issue, the locking pin or latch may need replacement by a professional.
12. Why Is My KitchenAid Mixer Having Speed Control Problems?
Speed control issues can be some of the most frustrating KitchenAid mixer problems. Your mixer might run only on high speed, ignore the speed lever, or change speeds unexpectedly while mixing.
Many of these problems are caused by a misadjusted speed control plate, worn governor components, a faulty phase control board, or loose wiring. Some can be corrected with simple adjustments, while others require internal repairs.
Use the table below to identify the problem you’re seeing, then follow the detailed guide for step-by-step troubleshooting.
Common KitchenAid Speed Control Problems
| Problem | Likely Cause |
|---|---|
| Mixer stuck on one speed | Misaligned speed control plate, governor spring, or phase board. See the full guide |
| Runs only on high speed | Control plate adjustment, governor spring, or phase board. |
| Won’t stay at the selected speed | Dirty contacts, worn governor assembly, or loose wiring. |
| Won’t start on low speeds | Misaligned control plate, faulty phase board, or wiring issue. |
| Speed lever feels loose or wobbly | Worn spring, loose screws, or shifted control plate. |
| Runs too fast on every setting | Governor assembly, speed control plate, or phase board. |
| Doesn’t respond to speed changes | Damaged speed control plate, wiring, or phase board. |
What Should You Check First?
If you’re not sure where to begin:
- Tighten and re-align the speed control plate if it appears loose or misaligned.
- Inspect the speed lever for excessive play or looseness.
- Check for loose wiring connections if you’re comfortable opening the mixer.
- If the problem persists, the governor assembly or phase control board may require replacement.
If your mixer still doesn’t respond correctly after these checks, follow the detailed guide for your specific speed control problem.
If DIY fixes don’t solve the problem, use our KitchenAid Repair Finder to locate certified repair services near you. It includes nationwide options and local centers in major cities for faster, reliable help.
How Do I Keep My KitchenAid Mixer in Good Condition?
Many KitchenAid mixer problems can be avoided with simple routine care. Like any hardworking appliance, your stand mixer will last longer—and run more smoothly—if you keep it clean, lubricated, and free from unnecessary strain.
Here are easy ways to keep your KitchenAid mixer in top shape:
1. Clean After Every Use
- Wipe down the mixer body with a soft, damp cloth right after mixing, especially around the motor head, speed lever, and attachment hub.
- Wash the bowl and attachments thoroughly so food doesn’t dry onto the surfaces.
- Check around the beater shaft for batter or dough buildup that can make attachments stick later.
2. Keep the Air Vents Clear
- Flour dust, powdered sugar, or kitchen grease can block the motor vents and cause overheating.
- Use a small brush or vacuum attachment to clear out debris so the motor stays cool.
3. Lubricate the Gears Periodically
- The food-grade grease inside your mixer keeps the gears running smoothly, but it can dry out over time.
- Re-grease once a year, or more often if you use your mixer frequently.
- Not comfortable opening the motor housing? A technician can do it quickly and inexpensively.
4. Avoid Overloading the Mixer
- Check your model’s manual for maximum flour or dough capacity and stick to those limits.
- For dense bread doughs, always use Speed 2. Higher speeds strain the motor and shorten its lifespan.
- Mix thick doughs in smaller batches to reduce wear on the gears and motor.
5. Store Attachments and Cords Properly
- Keep attachments in a drawer or storage caddy so they don’t get bent or damaged.
- Wipe and dry attachments thoroughly before storing to prevent rust.
- Wrap the power cord neatly after each use to prevent fraying or tangling.
6. Do a Quick Monthly Check
- Make sure all external screws feel snug. Vibration can loosen them over time.
- Check the bowl-locking mechanism and speed lever for unusual looseness.
- Inspect the power cord for cracks or damage; replace it if you spot wear.
7. Use Only Compatible Accessories
- Stick to attachments made for KitchenAid mixers. Off-brand parts can cause alignment or motor strain issues.
- Make sure each accessory locks securely before starting the mixer.
Pro Tip
Five minutes of care after each baking session and a quick inspection every month can save you costly repairs down the road and keep your mixer running like new.
When Should You Repair or Replace Your KitchenAid Mixer?
Some mixer issues are easy fixes. Others are best left to professionals, especially if they involve electricity, internal gears, or anything requiring specialized tools.
Here’s how to know the difference.
Can You Fix it Yourself?
| 🛠 DIY-Friendly Repairs | 👨🔧 When to Call a Professional |
|---|---|
Safe to handle yourself if you’re comfortable using simple tools:
| Skip the DIY and contact a technician if you notice:
|
Pro Tip: If your mixer is still under warranty, always start with KitchenAid’s official repair options. Unauthorized repairs may void your warranty.
If DIY fixes don’t solve the problem, use our KitchenAid Repair Finder to locate certified repair services near you. It includes nationwide options and local centers in major cities for faster, reliable help.
KitchenAid Repair Centers – Verified & Local Options
Below are repair services for New York, Los Angeles, Dallas, Phoenix & Atlanta. Verified certifications are marked; others should be confirmed before booking.
- New York, NY — KitchenAid Official Service Tool (Use ZIP search for certified techs)
- Los Angeles, CA — AES KitchenAid Repair Center (Factory-Certified, OEM parts) · Lerman Appliances (Verify) · LA Fixit (Verify)
- Dallas, TX — Guinco Service (Factory-Trained, OEM parts) · Uptown Appliance Repair (Verify)
- Phoenix, AZ — Guinco Service (Factory-Trained, OEM parts) · Appliance Works AZ (Verify) · Urban Appliance Repair Service (Verify)
- Atlanta, GA — Mr. Appliance of Greater Atlanta (Verify) · Appliance Tech Pros (Verify) · Appliance Care of Atlanta (Verify)
Tip: If your city isn’t listed, use the KitchenAid Service Tool and enter your ZIP code to find the nearest certified provider.
Always confirm certification, warranty coverage, and use of genuine KitchenAid parts when booking repairs.
Replacing your mixer instead? Compare current KitchenAid bowl-lift and tilt-head models before choosing a replacement.
Don’t Let KitchenAid Mixer Problems Ruin Your Baking
A mixer that suddenly goes quiet, starts running hot, rattles under load, or refuses to change speeds gives you clues about where to start.
Begin with the simplest checks, make the adjustments you’re comfortable handling, and know when an internal repair is better left to a professional.
A little routine care and the right response to early warning signs can prevent a small problem from becoming a bigger repair.
The goal is to get back to what your mixer should be doing: humming steadily through batter, whipping cream smoothly, and kneading dough without stopping, shaking, or struggling.
When something doesn’t sound, feel, or work right, come back to this guide. Use the symptom to narrow down the cause, try the appropriate fix, and get your mixer—and your baking—moving again.
Frequently Asked Questions
Need options beyond New York, L.A., Dallas, Phoenix, or Atlanta? Visit our full directory: KitchenAid Repair Finder — Nationwide & Major U.S. Metros
Why doesn’t my mixer scrape everything at the very bottom of the bowl? Every time I mix cream cheese it presses a lot of cheese on the bottom and up the sides and it won’t mix all of it. This morning it had about a cup of batter left that I had to scrape and mix with some of the other batter. I would not have bought this mixer if I knew it would do that. Any suggestions to get it to mix ALL of cheese and batter together?
Hi Barb,
The best solution I’ve found is a flex edge beater. Please see this post.
Cheers,
Rose
My KitchenAid Mixer has coated beaters which looks like wrapped flexible plastic. This material is coming off in little pieces – into my food mixture! My concern is this – how can I fix the beaters – I don’t want this coating in my recipes- is this safe to use? What is the remedy for this?
Lease respond-
Sharon MCTIGUE
440-420-9863
mctiguest@gmail.com
Hi Sharon,
Unfortunately you can’t repair coating that’s chipping off. If your mixer is still under warranty, I suggest you contact customer service. If not, the only option is to replace the beater. The beater’s coating is nylon. It’s not safe to have it in your food..
Cheers,
Rose
My KitchenAid tilt whisk attachment does not allow the machine to lock. It appears to be too large and tall for the stainless steel bowl. I’ve tried adjusting the screw but it has not helped. What else can I try?
Hi Susan,
Is it the original whisk that came with your KitchenAid Mixer? Does the beater and dough hook fit properly? Only the whisk has a problem? If so, I suggest you contact KitchenAid support here and ask for a whisk replacement.
Cheers,
Rose
Hello,
The lever to turn the mixer to different speeds works fine EXCEPT it springs from on to stir. It stays there if I want but I feel like that springing action isn’t correct. It should move like it does for the other speeds. I can move it to different speeds with no issue and it is fine. Does that make any sense?
Hi Joann,
Does the lever spring when you move it from 0 t0 STIR or does it spring on its own?
Rose
Hello,
Our kitchen aid sops working every two minutes,
Hi Neel,
That’s frustrating. Does your KitchenAid have overload protection (it shuts off and only runs again after you let it cool down). Or does it stop and restart even when it’s not warm?
A mixer that stops every couple minutes is often doing one of of these:
Overload protection kicking in. It happens when the motor is working too hard (thick dough, big batch, higher speeds). The mixer shuts itself off to protect the motor, and resets once it cools down, @20-30 minute.
Power/control issue: If it stops even with light mixing on low speed, it may be a loose outlet or cord, power extension cord problem, or a worn speed control board.
A few quick checks:
What are you mixing, and what speed? (For dough, keep it at Speed 2 and try a smaller batch.)
When it stops, does it feel warm and then work again after 20–30 minutes?
Can you try a different wall outlet (no extension) and see if it still happens?
If you share your model number (from the label under the base) and what you were mixing when it cuts out, I can point you to the most likely fix.
Rose